Roof drip edge flashing is an integral part of your roofing system that helps protect your home from water damage.
Typically installed along the edges of your roof, a drip edge is a narrow strip of material usually made from metal or vinyl.
While learning about drip edge is key to protecting your roof, it’s just as important to make sure your roofer is being upfront—this guide shows how to spot red flags before you get scammed.

Roof drip edge flashing’s primary job is to direct rainwater away from your roof and into the gutters, keeping water from seeping under the shingles and causing leaks.
Adequately installed drip edge flashing also enhances the durability of your roof and helps it last longer by preventing water intrusion.
That’s why most US building codes require drip edge flashing on roofs today.
In this guide, we’ll explore the types of drip edge flashing, how it works, and why this type of roof flashing is essential for protecting your home.
Why Install Drip Edge Flashing on Your Roof?
You might not think much about drip edge flashing—it’s easy to overlook.
But trust me, as someone who’s seen the damage caused by water issues, this little strip makes all the difference.
Drip edging does more than direct water away from your roof.
It also prevents wind from ripping up your shingles, ice dams forming in winter, and water from sneaking behind your fascia and siding. Without it, you are in trouble.
I learned this the hard way on a residential roofing job a few years back.
A client installed a new roof a few years ago, but no drip edge, as pictured below.

Over the last year, water started pooling, and the roof’s edge rotted. As a result, the wood fascia needed to be replaced entirely.
The homeowner spent around $12,000 to repair these areas and install a drip edge retroactively.
This all could’ve been avoided with the correct installation from the start.
Just remember, taking the time to install a drip edge correctly can save you costly repairs down the road. Next, let’s examine the costs of installing drip edge flashing.
Cost to Install Drip Edge Flashing
The average cost of installing drip edge flashing on an asphalt shingle roof, including all materials and labor, ranges from $4.02 to $10.70 per linear foot.
This cost assumes the drip edge is installed during a quality roof replacement or before a new roof.
In general, drip edge installation pricing is most affected by the job’s complexity, roof size, and the type of drip edge material installed.
For example, installing a copper drip edge costs $10.60 to $23.10 per linear foot.
Conversely, the cost to install an aluminum drip edge ranges from $2.10 to $6.50 per linear foot.
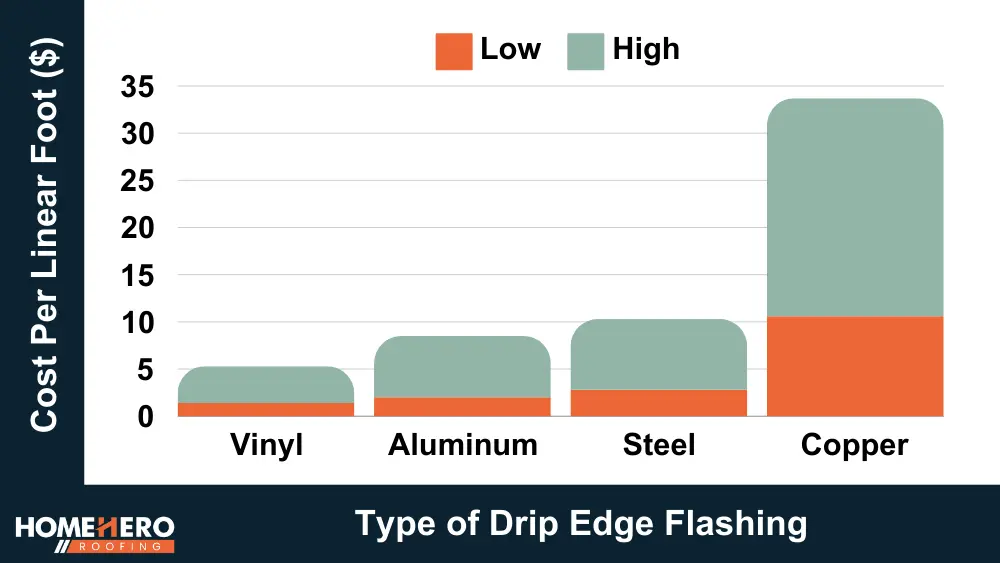
Here’s a comparison table listing the cost per linear foot for each type of roof drip edge flashing material, including both material and labor, from lowest to highest cost:
| Material | Total Cost (per linear foot) | Durability |
|---|---|---|
| Vinyl | $1.40 – $3.90 | 10 – 20 years |
| Aluminum | $2.10 – $6.50 | 20 – 40 years |
| Steel | $2.80 – $7.50 | 30 – 50 years |
| Zinc | $5.20 – $12.50 | 50 – 80+ years |
| Copper | $10.60 – $23.10 | 70 – 100+ years |
- Average Total Cost of Drip Edge Installation (US): $4.02 – $10.70 per linear foot
Please note that installing more expensive drip edge materials, like copper or zinc, requires more labor hours.
Find out how much a new roof costs in Chicago, Illinois, in our latest expert roofing article.
Key Drip Edge Price Insights:
- Vinyl is the most affordable option but has the shortest lifespan.
- Aluminum is a cost-effective and commonly used material with moderate durability.
- Steel offers more durability than aluminum but comes with a slightly higher cost.
- Zinc provides a premium look and superior longevity but is more expensive.
- Copper is the most expensive option, known for its exceptional durability and aesthetic patina over time.
This should help you choose based on your budget and desired lifespan for the roof drip edge flashing material!
Across the US, the average roof drip edge installation costs about $975, and most homeowners spend between $450 and $1,500. Again, these are average prices for drip edges installed during a standard roof installation.
Accordingly, reputable roofers should always include drip edge installation costs in a standard roof replacement quote. If your quote doesn’t, you should ask why they were omitted and perhaps look for a different contractor.
The average labor cost to install drip edge flashing ranges from $48 to $76 per hour, depending on the complexity of the job and local rates.
Can Drip Edges Be Installed After Shingles?
A drip edge can be installed after shingles or on an existing roof, but it’s trickier.
Ideally, drip edges should be installed during the roofing installation because that’s when it’s easiest to secure correctly.
If you add it later, gently lift the shingles and slide the drip edge underneath them without damaging them.
On average, installing drip edge flashing on an existing roof costs between $8 and $24 per linear foot.
Generally, installing drip edge flashing on an existing roof is three times more expensive than doing it before or during a new installation.
This is because working around the existing shingles without damaging them takes much more time and labor hours. Overall, it’s a delicate process but doable—although not a DIY project for the average homeowner to tackle.
Expert Tip: If you’re retrofitting a drip edge, ensure the overhang is about half an inch past the fascia. This will ensure proper water runoff and prevent moisture damage to your home’s structure.
Types of Drip Edge Flashing Materials
Homeowners install different types of drip edge flashing on their roofs.
Metal and vinyl are the most popular materials used by professionals.
Here are the most common types you can likely find at your local Home Depot or Lowes hardware store.
1. Metal Flashing
Metal flashing is the most common drip-edge flashing material.
Aluminum, copper, and steel are the most common metal flashing types.
We’ll also discuss the pros and cons of the most underappreciated flashing material: zinc drip edge flashing.
Each type of metal drip edge has pros and cons, which we’ll highlight next.
Aluminum Drip Edge
Aluminium is a popular choice for drip edge flashing because it is lightweight and easy to handle. One of its key benefits is its rust resistance, which helps it maintain its appearance over time.
Now, aluminum can come in various colors, allowing homeowners to match it with their roofs for a seamless look. Find out how to pick the best roof color to see the most beautiful exterior combinations trending in Chicago, Illinois.
However, it is essential to know that aluminum can bend easily, especially in strong winds. This means it may need careful installation to ensure it stays in place.

While aluminum is durable, some areas with harsh weather may not last as long as other materials.
Pros:
- Lightweight and easy to install
- Rust-resistant
- Affordable
Cons:
- Can bend in high winds
- It may not last as long in extreme climates
The average cost to install aluminum drip edge flashing, including all labor and materials, ranges from $10.60 to $23.10 per linear foot.
Copper Drip Edges
Copper is another metal drip edge flashing type. It is known for its longevity and durability.
Indeed, copper drip edges look fantastic and have a long lifespan but are expensive.
Unlike other materials, copper does not rust or corrode, making it an excellent option for areas with heavy rain. As it ages, copper develops a unique green patina, which many homeowners find attractive.
However, copper drip edging is more expensive than other materials like aluminum.

Despite the cost, its strength and lifespan can make it a worthwhile investment for your roofing system, ensuring reliable protection for your home for many years.
Pros:
- Extremely durable and long-lasting
- It does not rust or corrode
- Develops a unique patina
Cons:
- High upfront cost
One crucial fact about copper drip edges is that they are ideal for historic or coastal homes due to their resistance to saltwater corrosion.
Remember this as you decide on your roof drip edge materials.
How Much Does Copper Drip Edge Roof Flashing Cost?
Over time, copper drip edges develop a green patina, adding a unique, premium-looking aesthetic to your home.
However, this comes at a cost. Most homeowners pay around $10.60 to $23.10 per linear foot for copper drip edges, including labor and materials.
Moreover, installing copper takes longer than your average flashing material.
Accordingly, complex installation costs can increase the price of copper drip edge flashing by 20 to 30%.
While the upfront cost is higher, copper’s longevity and resistance to the elements often make it a worthwhile investment.
Steel Drip Edges
Steel is another common material for drip edge flashing. It is known for being very strong and durable.
One of its main advantages is its ability to withstand severe weather conditions, which makes it an excellent choice for areas prone to storms.
However, steel can rust if not properly coated.
Homeowners should choose galvanized or stainless steel options for added protection against corrosion. While it may be heavier than aluminum or copper, steel provides excellent stability and support.

All in all, steel can be a reliable choice for those looking for a sturdy and lasting solution for their roofing needs.
Pros:
- Extremely durable
- Great for extreme weather conditions
- Strong and stable
Cons:
- Can rust if not properly coated
- Heavier and more challenging to install
Learn about the different roofing materials used on residential homes in our latest professional roofing material guide for homeowners.
Cost of Steel Drip Edge Flashing
On average, steel drip edge installation costs range from $2.80 to $7.50 per linear foot, including all materials and labor.
Steel is heavier than aluminum but holds up well under extreme conditions. Its added weight provides stability, though rust can become a concern if it’s not galvanized steel.
Zinc Flashing
Zinc flashing is an underappreciated drip edge option.
Though pricier, zinc has self-healing properties that can repair scratches and minor damage over time.
Zinc flashing, including materials and labor, can cost an average of $5.20 to $12.50 per linear foot.
However, its long lifespan and durability make it ideal for regions with fluctuating weather conditions.
2. Vinyl Flashing
Vinyl is another alternative for drip edge flashing. It is lightweight and inexpensive, making it popular among many homeowners.
One of the main benefits of vinyl flashing is corrosion resistance. This means it can last a long time without losing its appearance.
Moreover, vinyl is easy to install, saving time and money when roofing.
However, it might not be as strong as metal options like steel or copper.

In very harsh weather, vinyl flashing can become brittle and may crack. Therefore, while vinyl can be a cost-effective option, consider the local climate and the specific needs of your roofing project.
Pros:
- Lightweight and easy to install
- Corrosion-resistant
- Most affordable option
Cons:
- Can crack in extreme weather
- Not as strong as metal options
Cost of Vinyl Drip Edge Flashing
Vinyl is a budget-friendly alternative to metal options. It’s lightweight, inexpensive, and resistant to corrosion, making it a popular choice for homeowners looking for affordability.
Vinyl drip edge costs range from $1.40 to $3.90 per linear foot, including materials and installation labor.
However, vinyl isn’t as durable as metal options and may become brittle in freezing weather, which could lead to cracking over time.
Overall, vinyl flashing offers many homes a reasonable balance between cost and performance.
Different Drip Edge Flashing Shapes
Drip edge flashing comes in different shapes to suit roofing needs and architectural styles. Here are the most common shapes.
T-Shaped Drip Edges
The T-shaped drip edge, or Type D drip edge, is often preferred by roofing professionals and organizations like the Asphalt Roofing Manufacturers Association (ARMA) because it directs water away from the fascia so well.
This type has a horizontal flange extending over the roof deck and a vertical flange that helps channel water further from the roofline.
For homes that experience a lot of wind-driven rain or snow, T-shaped drip edges are the way to go. They offer added protection, especially in areas where shingles overlap, making them an ideal choice for multi-layered roofs.
In short, the T-shape is a smart upgrade if you want a solid defense against water damage.

Personal Anecdote: I had a client with only an L-shaped drip edge installed on their roof.
They thought it was holding up just fine—until a storm hit. Wind-driven rain started sneaking behind the fascia, causing costly rot we didn’t catch until it was too late.
After replacing it with a T-shaped drip edge, the difference was night and day.
It solved the water problem and gave the homeowner peace of mind, especially during the next storm season.
If you’re in an area prone to heavy rain or high winds, like the west suburbs of Chicago, Illinois, upgrading to a T-shaped drip edge is smart.
J-Shaped Drip Edges
J-shaped drip edges are perfect for low-sloped or flat roofs.
They offer an extra layer of protection by keeping water from creeping back up the roof, a process called capillary action, which can develop more quickly on flat surfaces.
With a J-shaped profile, you secure the roof’s edge against wind-driven rain and prevent water from pooling, which are common issues with low-slope designs.
Moreover, if your roof is flat or gently sloped, a J-shaped drip edge is essential for keeping it watertight.
Fascia-Type Drip Edges
Fascia-type drip edges are usually installed on homes without gutters. They’re designed to protect the fascia board and prevent water from running down the side of your house.
While fascia-type flashing provides excellent protection, pairing it with soffit flashing works even better. This gives your roof’s eaves full coverage, keeping the underlying structure dry and safe from water damage.
If your home doesn’t have gutters, or you’re dealing with a gutter-less section of the roof, fascia-type drip edges are a must to prevent water from getting into your fascia and causing rot.
F-Type Drip Edge Flashing
F-type drip edges, or gutter aprons, are designed for maximum water management.
Accordingly, an extended flange directs water into the gutter, making them ideal for roofs where water runs off fast.
Specifically, an F-type drip edge is beneficial when retrofitting roofs, installing them on rake edges, or covering existing shingles, where controlling runoff is crucial.

Personal Experience: I once worked on a roof where the homeowner didn’t realize the importance of gutter aprons, and they were relying on a basic drip edge to manage water.
After a few heavy rainstorms, the water started seeping behind the gutters, causing leaks.
We switched to F-type flashing, and the problem was immediately solved. It’s a small change, but it can make all the difference in keeping your roof and home dry.
The F-type is my go-to choice if you want maximum protection against water seeping behind the gutters, especially on steep-sloped roofs where water runoff is fast and frequent.
Gravel Stop Drip Edges
If you have a flat or commercial-style roof, a gravel stop drip edge is another easily overlooked type that can extend roofing lifespans.
This type is designed with a raised lip that keeps gravel or other materials from washing off the roof while directing water away.
Gravel stop drip edges aren’t needed for a standard residential roof.
But if you have a flat roof with a gravel surface or membrane, it’s a great option to ensure your roof and roofing materials stay in place.
Benefits of Installing Drip Edge Flashing
Installing proper drip edge flashing has many benefits. Here are some of the most important reasons why it is a brilliant idea.
1. Prevents Water Damage
Drip edge flashing channels water away from the fascia and underlayment, helping to prevent leaks and water damage to your roof structure. This is crucial for avoiding rot and deterioration of the roofing components and the underlying wood. In our new post, you will find out what popular paint colors work best for brown roof shingle homes!
2. Protects the Fascia and Soffits
Drip edge flashing directs water away from the roof’s edge, shielding the fascia and soffits from potential damage. The extra protection helps maintain the structural integrity and appearance of your roofline.
3. Reduces Ice Dams
In colder climates, drip edge flashing can help reduce the formation of ice dams by allowing water to flow off the roof more efficiently. This minimizes the risk of ice buildup, which can cause significant damage to both the roof and the gutters.
4. Enhances Roof Longevity
Installing drip edge flashing contributes to the overall longevity of your asphalt or metal roofing system.
Drip edge flashing helps extend the lifespan of your roof by preventing water infiltration and protecting critical areas. It also reduces the need for frequent repairs.
Get the low down on how long the average roof lasts in states like Illinois so you know when to start budgeting for a new roof.
5. Helps Resist Wind Uplift
A properly installed drip edge creates a tighter seal at the roof line, reducing the risk of water damage and material blow-offs during storms.
This is essential for homes in high-wind or storm-prone regions of the United States.
6. Improves Gutter Efficiency
Drip edge flashing ensures that water flows directly into the gutters, improving their efficiency and reducing the risk of overflow.
Indeed, this helps maintain proper drainage and prevents water from spilling over and damaging your home’s exterior.
7. Extended Warranty Protection Through Proper Installation
Many homeowners aren’t aware that improper drip edge flashing installation can void their roof warranty.
Major manufacturers, such as Owens Corning, GAF, and CertainTeed, may require specific drip edge dimensions and materials for extended warranty protection.
Integrating drip edge flashing with other roofing components, such as underlayment and starter shingles, ensures your roof system works as designed.
Indeed, this is often a prerequisite for maintaining full coverage under roofing warranties.
8. Compliance with Building Codes: Overlooked but Critical
Many building codes now require drip edge flashing, but many local roofing contractors ignore the details of these regulations.
For example, the International Residential Code (IRC) mandates the installation of drip edge flashing along all roof eaves and rakes.
However, the required overlap and securement with roofing material vary by region, and failure to comply can void insurance claims in case of water damage.
What Color Should the Drip Edge Be?
The color of your drip edge can make a big difference in your roof’s appearance. Ideally, it should match or complement your fascia or gutters.
For example, if your fascia is white, a white drip edge can give your home a clean, seamless look.
On the other hand, a brown drip edge works well with darker roofs or wood-stained fascia.

Choosing the right color helps blend the drip edge into your overall roof design, making it less noticeable while still doing its job.
Should Drip Edge Flashing Be Painted?
Yes, you can paint your home’s drip edge flashing, but using the right paint is crucial.
Most drip edges come in standard colors like white, black, or brown, but painting is an option to match your fascia exactly.

Use exterior paint that can handle the weather. More specifically, choose vinyl-safe paint colors, like this palette by Sherwin Williams, so the flashing doesn’t overheat and peel prematurely.
Remember that painted drip edges may need touch-ups over time to maintain their look.
A factory-finished drip edge might save you the hassle if you want something low-maintenance.
What About the Drip Edge Profile and Overhang?
The drip edge profile and overhang are also crucial for function and appearance.
As previously mentioned, the profile determines the shape of the drip edge—usually L-shaped or T-shaped. Accordingly, the shape of the drip edge determines how water flows away from your roof.
As a reference, the overhang of the drip edge should extend about half an inch past the fascia to prevent water from dripping down the side of your home.
Whether you choose a sleek or more pronounced profile, the key is to ensure it looks good while protecting your roof from water damage.
When to Install Drip Edge Flashing
There are optimal times to install drip edge flashing without doing more work than usual.
Here are some of the most efficient times to consider it, saving you tons of money and headaches.
During New Roof Installation
Drip edge flashing should also be installed when a new roof is installed. This helps protect your home from water damage from the start.
When Replacing Old Roofing
If you’re replacing your roof, installing or upgrading the drip edge flashing is an ideal opportunity.
Adding new drip edge flashing during a whole roof replacement ensures that your updated roof has optimal protection against water damage.
This step is crucial for securing the edges and enhancing the overall effectiveness of your new roofing system.
While Repairing Roof Damages
Install drip edge flashing to prevent further issues if your roof has damage, such as missing shingles or leaks.
Most of the equipment needed to install drip edges, including ladders and tools, is used in common roof repair work on homes.
If done together, you can kill two birds with one stone, ultimately paying less than you would if you performed repairs and installed the drip edge separately.
During Gutter Replacement
When replacing gutters, adding drip edge flashing is an intelligent move. It improves water flow into the gutters and reduces overflow risks.
Before Winter Weather
Install drip edge flashing before winter arrives. It helps manage water and ice, reducing the risk of ice dams and water damage during cold months.
Step-by-Step Guide to Drip Edge Installation
Here are the exact steps to install drip edge flashing on your home.
Step 1: Gather Materials and Tools
You’ll need drip edge flashing, roofing nails or screws, a hammer or drill, a measuring tape, and a utility knife.
Step 2: Measure and Cut Flashing
Measure the length of the roof edges where the drip edge will go. Cut the drip edge flashing to fit these measurements, allowing for a slight overlap at the joints.
Step 3: Prepare the Roof
Clean the area where you’ll install the drip edge. Remove debris, old nails, or damaged shingles to ensure a clean surface for proper installation.
Step 4: Position the Drip Edge Flashing
Place the drip edge flashing along the roof edge, extending slightly over the edge and covering the roof decking. Align the flashing so that it fits snugly and evenly.
Step 5: Secure the Flashing
Nail or screw the drip edge flashing into place, starting at one end and working your way to the other. Space the fasteners about 8 to 12 inches apart. Ensure the nails or screws are flush with the flashing.
Step 6: Overlap and Seal Joints
If you have multiple flashing pieces, overlap them at the joints to ensure a continuous seal. Use roofing sealant or caulk to seal the joints and prevent leaks.
Step 7: Install Roofing Material
Install your roofing material once the drip edge flashing is secured and sealed.
Asphalt shingles or other roofing materials should cover the flashing to ensure maximum protection.
Code often requires installing roofing shingles over the drip edging a minimum of 3/8” at both the eave edge and the rake edge. This installation requirement ensures that water doesn’t fall behind your soffit or, even worse, your siding.
Step 8: Inspect the Installation
Check the installed drip edge flashing for any gaps or loose sections. Ensure it is properly aligned and securely fastened. Make any necessary adjustments to ensure a tight seal.
Step 9: Clean Up
Remove any leftover materials, tools, and debris from the installation area. Ensure everything is clean and in good condition.
Following these steps will help ensure that your drip edge flashing is installed correctly and effectively protects your roof.
Common Mistakes to Avoid
When installing drip edge flashing, avoiding common mistakes is crucial for ensuring long-term effectiveness and roof protection. Here are some pitfalls to watch out for:
Incorrect Placement
Installing drip edge flashing too high or too low can prevent water from being directed adequately into your gutters. Ensure it’s positioned correctly along the roof’s edge.
Improper Overlapping
Remember that overlapping sections of drip edge flashing are essential to creating a watertight seal. Failure to do so can lead to leaks and water damage.
Ignoring Roof Pitch
The roof’s pitch affects how water flows. Choose the correct type of drip edge flashing for your roof’s pitch to avoid water pooling or improper drainage.
Neglecting Gutter Alignment
Drip edge flashing should align with the gutters to channel water effectively. Misalignment can cause water to spill over, leading to potential damage.

Skipping Sealant
While some drip edge flashing comes with built-in sealants, additional sealant should be applied where necessary to ensure proper sealing of all seams and joints. This can also help with wind resistance!
Repairing and Maintaining Drip Edge Flashing
Drip edge flashing is critical in protecting your roof by directing water away from the eaves and preventing damage to your roofing materials.
Proper repair and roof maintenance are essential to ensuring the adequate performance of the drip edges and the entire roofing system.
Here’s how to keep your drip edge flashing of your house in top condition:
1. Regular Inspections
Inspect your drip edge flashing regularly, especially after severe weather events.
Look for signs of damage, such as bent or detached flashing, and check for debris buildup.
Early detection of problems can prevent more significant issues down the line.
2. Cleaning Debris
Keep the area around your drip edge flashing clean.
Remove leaves, twigs, and other debris that can obstruct water flow and potentially cause water to back up under the roofing materials.
Regular cleaning helps maintain proper drainage and prevents rust and deterioration.

3. Repairing Damage
If you find any damage during your inspections, address it promptly.
Minor issues, like small bends or loose sections, can often be fixed with roofing cement or by repositioning the flashing.
You may need to replace the affected flashing sections if you find significant damage, such as large dents or rust.
4. Replacing Flashing
If your drip edge flashing is severely damaged or worn out, replacement may be necessary.
First, remove the old flashing carefully and install new flashing that matches the existing style and material.
Ensure the new flashing is adequately secured and sealed to prevent leaks.
5. Professional Assistance
It’s best to consult with a professional roofer near you for extensive damage or complex repairs.
They can provide expert advice and ensure that your drip edge flashing is repaired or replaced correctly, maintaining the integrity of your roof.
Which is Better: Gutter Aprons or Drip Edges?
Choosing between a gutter apron and a drip edge depends on what you’re trying to protect.
Both have their place, but they serve slightly different purposes.
Let’s dive into a detailed comparison below.
Gutter Aprons Vs. Drip Edges
A gutter apron is designed to protect the area where your roof meets the gutter.
It directs water straight into the gutter, preventing it from flowing behind it and causing rot or water damage to your fascia.
This is especially helpful if you live in an area with tons of rain.

A drip edge, on the other hand, protects the edge of your roof from water damage.
It’s installed under the shingles and directs water away from the roof’s edge, keeping it from seeping into the fascia and causing rot.
If you want all-around protection for your roof, a drip edge is often the better option versus a gutter apron alone. Both are useful, but a drip edge is the best option if you’re focused on protecting your roof from water damage and rot.
A gutter apron does the trick if your primary concern is ensuring water diverts into your gutters without causing issues.
In some cases, using both drip edges and gutter aprons combined can give you maximum protection.
Conclusion
Drip edge flashing is an essential component of a well-protected roof, offering numerous benefits that safeguard your home from water damage.
Proper installation and maintenance can prevent costly repairs and extend the life of your roof.
If you’re considering adding or updating drip edge flashing on your roof, our team at HomeHero Roofing is here to help.
Our expert team provides top-rated roofing services in our hometown of Downers Grove, IL, and all surrounding Chicagoland suburbs.